Showing posts with label Bolt Action. Show all posts

Friday, February 3, 2017

Odds and Ends

I've decided to mix it up a little bit and try some stuff out before moving full on into my Finnish army.

Last weekend I attended a two day painting clinic. I had a blast learning new techniques and refining my current knowledge. I learned a lot and had fun working on the figure they provided for us:


Fantasy figures aren't really my thing at all, but I'll be sure to use the same techniques when working on display figures for my Bolt Action armies.

Next up, I'm been wrapping up the build and painting of the Corsair for my good friend Andy Singleton's USMC. The build has been a lot of fun and I've only got the base left to finish before I pack it up and ship it off:


And finally, I've been working on a K-47 style mech for a contest in a painting group I'm in. The mech is styled after a WW2 soviet tank. It's been a good exercise and excuse to try out various winter weathering techniques before I jump into some future projects.


As always, thanks for looking and have a great one!


Jake

Thursday, November 17, 2016

Running with the Tortoise

The past week has seen me dive head first into preparing for the January Blitzfreeze 2016 tournament I’m helping hold for the Twin Cities area of Minnesota.  We’ve capped out the available venue space of 18 participants for the January 7, 2016 event and I’ve wasted no time in making preparations for the event.  I’ve spent a fair amount of time discussing plans with the venue, evaluating rules and scenarios, and preparing media that will be handed out to the participants, preparing awards that will be given out, and preparing a board that I will be providing myself.  I managed to score an Urbanmatz roll-away terrain mat that I’ll be writing a review for later.


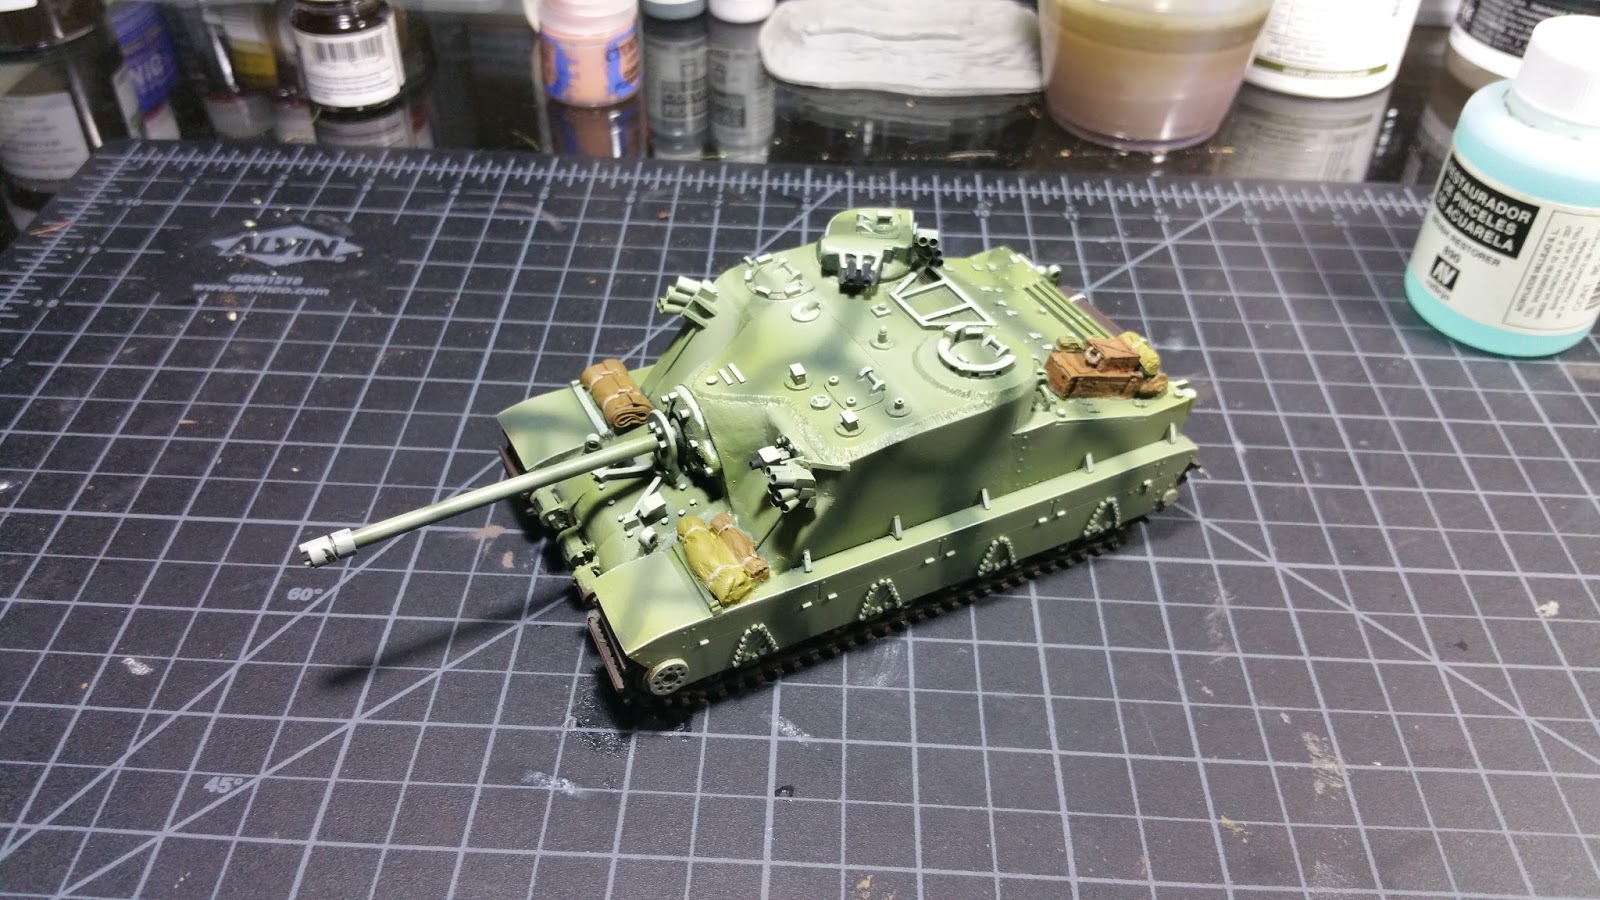
Aside from planning the tournament, I’ve been busy preparing gift commissions for friends who’ve been encouraging and incredibly helpful along the way with this hobby.  Up on deck is the Tortoise by JTFM, an ISU-122 assault gun, and a 1/72 corsair.  An Italian tankette is on the way, but it’s currently in the post.


This week I’ve been having a blast working on the Tortoise.  Once I have completed it, I will write a detailed review along with a step-by-step on how I painted it.  Until then, here’s a brief glimpse at the lovely resin Tortoise, courtesy of JTFM!


If you enjoy this blog, feel free to leave a comment below as it really helps the site out.  Additionally, if you'd like to pick up this resin beast of British engineering that is the Tortoise, head on over to Die Waffenkammer or follow this link to the direct listing.


I’ll be following up with this post as I begin to paint Rubicon’s ISU-122.  In a future post, I will be reviewing and painting one of Warlord’s kits: the Italian C3 Tankette!  Until next time, have a great one.

Tuesday, November 1, 2016

The Biggest Fish in the Pond (For now)

The ISU-152 is no longer the big fish in the pond.  The beastly British post 1945 tank destoryer, the Tortoise, from JTFM Die Waffenkammer has arrived

A huge thanks goes to Jeff and Rich!

If you're as excited as I am about working on this thing and would like one of your own, follow this link to the Tortoise or head on over to Die Waffenkammer and check out the vast selection of models.  Jeff has told me that this is just one of the many "after '45" kits they are releasing!

With the Alte behind me, and in the case until it's used for play, I've resumed priming the rest of my Finns and aim to complete my 1,000 points of them for the tournament I'm co-hosting on January 7, 2017.

Thanks for looking!

Jake

Sunday, October 30, 2016

The Painting Guide for Rubicon’s 250 Alte

It’s been a while in the works due to life taking me for a spin, but I’m back with this tutorial walk-through on how I painted my Alte by Rubicon.  My methods of painting tend to leave my subject a bit grittier than most would leave their vehicles. Take what you will from this walk-through!

My goal with this vehicle is to emulate the appearance and condition a vehicle would appear to be while in service to the Desert Afrika Corps.

Keep in mind that I left the interior blank as I have a crew that I’m working on separately that will be placed, along with equipment inside of the vehicle.

Without further ado, we start the model off with quick bit of primer.  I tend to use the airbrush and apply Alclad’s black primer in two light passes.  It’s enough to give the paint something to adhere to, but it also preserves the details.


Once, the primer has cured for at least 12 hours, I apply a Tamiya’s German Grey.  I keep the tone dark and I do not apply any highlights as I want the darker paint to show through a bit once the sand color is applied.  Believe me, it’ll make sense in the later steps. Sadly, I forgot to take a picture of the vehicle in its grey state.

After the grey has cured, I applied Ammo’s Washable Sand in light passes over the vehicle.  You’ll want to keep the coverage a bit sporadic and hardly uniform as you’ll want some of the original color to show through.  The goal here is to emulate the paint job the crew applied while gearing up for the field.


After the paint has had time to dry a bit, I took a larger chisel-tipped brush and began to wear on the sand color to create breaks in the paint and soften its coverage.  In places where I took too much off, I followed up with an additional light coat of the washable sand color.


With the washable sand color weathered as much as I felt necessary, I sealed the model with a satin coat and let the model sit for at least 12 hours.  Once the satin coat was cured, I began the process of applying decals to the vehicle.


As the decals dried, I took the opportunity to begin painting the details and gear of the vehicle.  For colors, I used Scale 75’s ScaleColor range as I love how flat the colors dry. After I finished painting the small details, I clear-coated the model with an additional coating of satin and prepared to apply filters and washes.


From here, I did a bit of back and forth with adding filters and washes and backtracking if I felt the need.  I used filters and washes by Ammo and I even broke out the oil paints and enamel thinner.  I worked in small steps and made sure to let the model dry before applying additional filters and effects.  Once I was happy with the filters and various washes, I did a once-over with pin washes to really bring out the details in the vehicle.


Satisfied with the oils, washes, and filters, I began the process of adding elements such as subtle streaks, chips, and scuffs to the vehicle.  I did the streaking effects with Ammo products and used acrylic paints for the subtle chipping and scuffs.

As I was on the homestretch, I took the opportunity to look the vehicle over for anything that I may have missed.  Satisfied, I applied pigments to the model with the use of enamel thinner and pigments by Ammo.  I did a tiny brush-full of pigments to a bit of thinner to create a nearly clear wash.  I built this wash up around the vehicle where I wanted pigments to accumulate.


With the pigments in place, the Alte is now completed!


If you enjoyed the review, feel free to leave a comment below as it really helps the site out.  Additionally, if you'd like to pick up this reduced-fat version of a Hanomag, head on over to Rubicon or follow this link to the direct listing.

Thanks for looking!


Tuesday, October 11, 2016

Finland!

So I've been holding out: I have Finns and they're wonderful!

I intended on not showing them until they were completed but I'm thinking that posting them as I progress will a better motivator for me.

After having them assembled and primed, I've now started on working on batches of ten guys at a time.  Tonight, I started work on the skin!

I started off with a basecoat of flesh and then added some subtle highlights using glazes and a bit of the loaded brush technique.  I then added some into the details and then will work up the highlights a bit more.

I have a ways to go but it certainly feels good to be back painting again!

Thanks for looking!

Monday, September 5, 2016

Busy, busy, busy

With my wedding less than 11 days away, my schedule has been hectic to say the least.  Never the less, I was able to carve some time out this weekend to put my new shelving up for my paints.
Once through wedding and honeymoon are over, I'll be back at it!
Jake