Thursday, November 17, 2016

Running with the Tortoise

The past week has seen me dive head first into preparing for the January Blitzfreeze 2016 tournament I’m helping hold for the Twin Cities area of Minnesota.  We’ve capped out the available venue space of 18 participants for the January 7, 2016 event and I’ve wasted no time in making preparations for the event.  I’ve spent a fair amount of time discussing plans with the venue, evaluating rules and scenarios, and preparing media that will be handed out to the participants, preparing awards that will be given out, and preparing a board that I will be providing myself.  I managed to score an Urbanmatz roll-away terrain mat that I’ll be writing a review for later.


Aside from planning the tournament, I’ve been busy preparing gift commissions for friends who’ve been encouraging and incredibly helpful along the way with this hobby.  Up on deck is the Tortoise by JTFM, an ISU-122 assault gun, and a 1/72 corsair.  An Italian tankette is on the way, but it’s currently in the post.


This week I’ve been having a blast working on the Tortoise.  Once I have completed it, I will write a detailed review along with a step-by-step on how I painted it.  Until then, here’s a brief glimpse at the lovely resin Tortoise, courtesy of JTFM!


If you enjoy this blog, feel free to leave a comment below as it really helps the site out.  Additionally, if you'd like to pick up this resin beast of British engineering that is the Tortoise, head on over to Die Waffenkammer or follow this link to the direct listing.


I’ll be following up with this post as I begin to paint Rubicon’s ISU-122.  In a future post, I will be reviewing and painting one of Warlord’s kits: the Italian C3 Tankette!  Until next time, have a great one.

Tuesday, November 1, 2016

The Biggest Fish in the Pond (For now)

The ISU-152 is no longer the big fish in the pond.  The beastly British post 1945 tank destoryer, the Tortoise, from JTFM Die Waffenkammer has arrived

A huge thanks goes to Jeff and Rich!

If you're as excited as I am about working on this thing and would like one of your own, follow this link to the Tortoise or head on over to Die Waffenkammer and check out the vast selection of models.  Jeff has told me that this is just one of the many "after '45" kits they are releasing!

With the Alte behind me, and in the case until it's used for play, I've resumed priming the rest of my Finns and aim to complete my 1,000 points of them for the tournament I'm co-hosting on January 7, 2017.

Thanks for looking!

Jake

Sunday, October 30, 2016

The Painting Guide for Rubicon’s 250 Alte

It’s been a while in the works due to life taking me for a spin, but I’m back with this tutorial walk-through on how I painted my Alte by Rubicon.  My methods of painting tend to leave my subject a bit grittier than most would leave their vehicles. Take what you will from this walk-through!

My goal with this vehicle is to emulate the appearance and condition a vehicle would appear to be while in service to the Desert Afrika Corps.

Keep in mind that I left the interior blank as I have a crew that I’m working on separately that will be placed, along with equipment inside of the vehicle.

Without further ado, we start the model off with quick bit of primer.  I tend to use the airbrush and apply Alclad’s black primer in two light passes.  It’s enough to give the paint something to adhere to, but it also preserves the details.


Once, the primer has cured for at least 12 hours, I apply a Tamiya’s German Grey.  I keep the tone dark and I do not apply any highlights as I want the darker paint to show through a bit once the sand color is applied.  Believe me, it’ll make sense in the later steps. Sadly, I forgot to take a picture of the vehicle in its grey state.

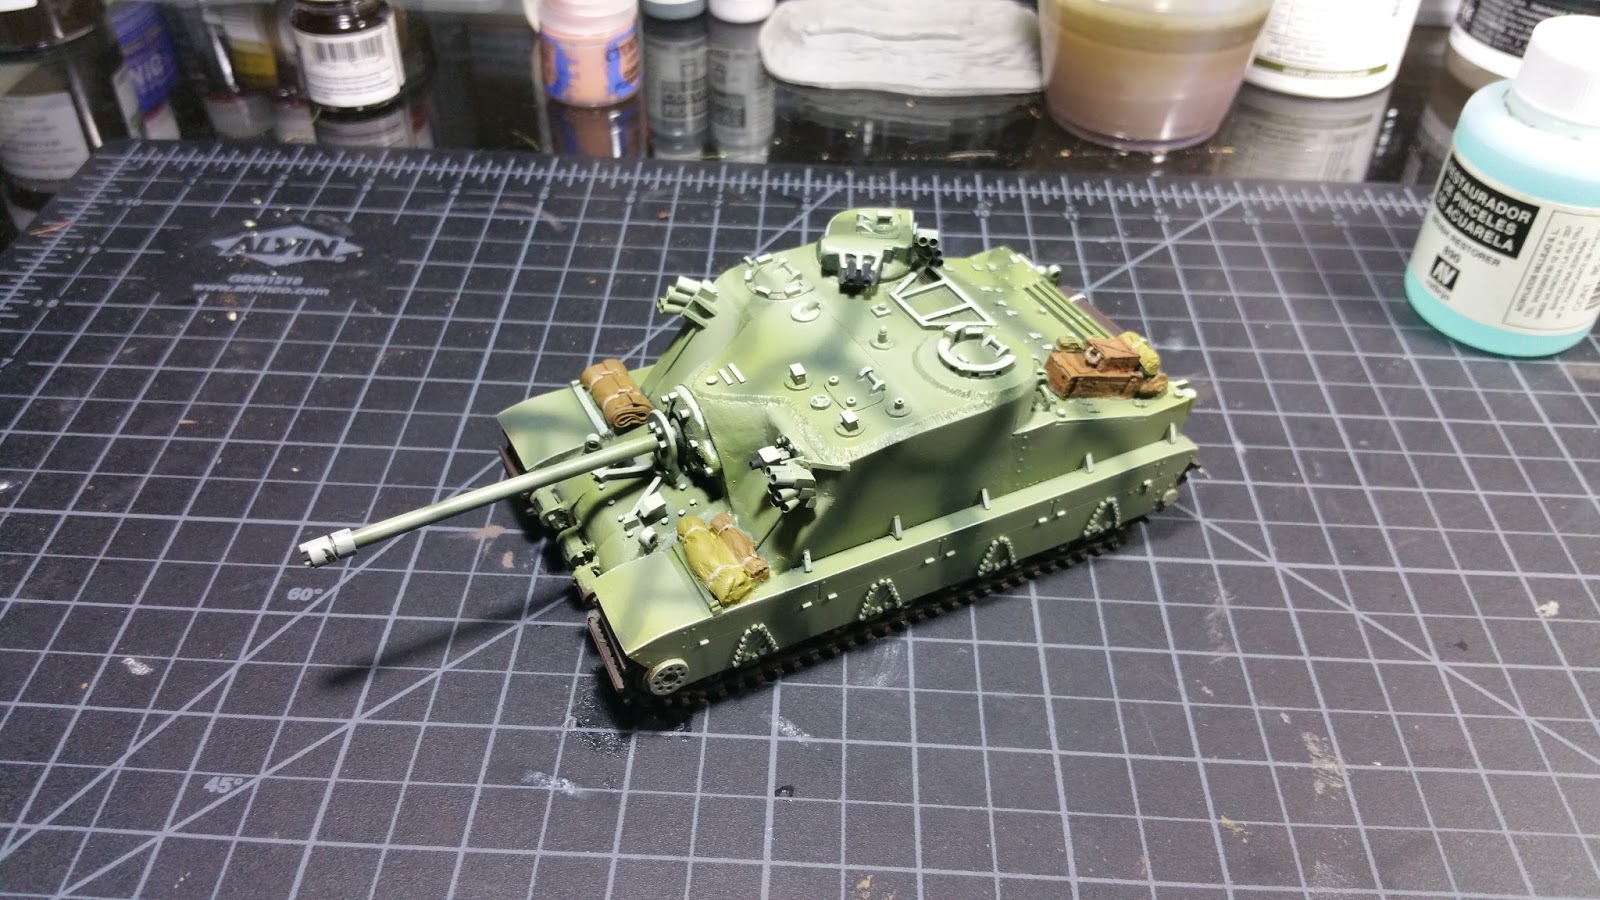
After the grey has cured, I applied Ammo’s Washable Sand in light passes over the vehicle.  You’ll want to keep the coverage a bit sporadic and hardly uniform as you’ll want some of the original color to show through.  The goal here is to emulate the paint job the crew applied while gearing up for the field.


After the paint has had time to dry a bit, I took a larger chisel-tipped brush and began to wear on the sand color to create breaks in the paint and soften its coverage.  In places where I took too much off, I followed up with an additional light coat of the washable sand color.


With the washable sand color weathered as much as I felt necessary, I sealed the model with a satin coat and let the model sit for at least 12 hours.  Once the satin coat was cured, I began the process of applying decals to the vehicle.


As the decals dried, I took the opportunity to begin painting the details and gear of the vehicle.  For colors, I used Scale 75’s ScaleColor range as I love how flat the colors dry. After I finished painting the small details, I clear-coated the model with an additional coating of satin and prepared to apply filters and washes.


From here, I did a bit of back and forth with adding filters and washes and backtracking if I felt the need.  I used filters and washes by Ammo and I even broke out the oil paints and enamel thinner.  I worked in small steps and made sure to let the model dry before applying additional filters and effects.  Once I was happy with the filters and various washes, I did a once-over with pin washes to really bring out the details in the vehicle.


Satisfied with the oils, washes, and filters, I began the process of adding elements such as subtle streaks, chips, and scuffs to the vehicle.  I did the streaking effects with Ammo products and used acrylic paints for the subtle chipping and scuffs.

As I was on the homestretch, I took the opportunity to look the vehicle over for anything that I may have missed.  Satisfied, I applied pigments to the model with the use of enamel thinner and pigments by Ammo.  I did a tiny brush-full of pigments to a bit of thinner to create a nearly clear wash.  I built this wash up around the vehicle where I wanted pigments to accumulate.


With the pigments in place, the Alte is now completed!


If you enjoyed the review, feel free to leave a comment below as it really helps the site out.  Additionally, if you'd like to pick up this reduced-fat version of a Hanomag, head on over to Rubicon or follow this link to the direct listing.

Thanks for looking!


Tuesday, October 11, 2016

Finland!

So I've been holding out: I have Finns and they're wonderful!

I intended on not showing them until they were completed but I'm thinking that posting them as I progress will a better motivator for me.

After having them assembled and primed, I've now started on working on batches of ten guys at a time.  Tonight, I started work on the skin!

I started off with a basecoat of flesh and then added some subtle highlights using glazes and a bit of the loaded brush technique.  I then added some into the details and then will work up the highlights a bit more.

I have a ways to go but it certainly feels good to be back painting again!

Thanks for looking!

Tuesday, October 4, 2016

Back from the Honeymoon!

My wife and I arrived back from the Hawaiian island of Kauai on Saturday.  The time difference between Princeville Kauai and Ramsey, Minnesota is 5 hours.  I fell asleep on Saturday evening and didn't wake up until roughly 11 hours later late Sunday morning.

I managed to get some reading done for the new edition of the Bolt Action rules.  I do like the changes and I think they'll make the game both more fluid and interesting.  Tonight I'll get back to work on my models.

Closing up this post for today is a panoramic image I took overlooking Hanalei Bay.  I normally don't cross my two hobbies, but photography does play a role in capturing my work in scale modeling.

Milky Way over Hanalei Bay
September 24, 2016

This is a 6 panel panoramic image shot looking over Hanalei Bay on the Hawaiian island of Kauai.  This was taken on the first night of our honeymoon and didn't take long at all to shoot due to such dark skies.  I believe I caught some zodial glow in the lower right corner.  Very little tweaking was needed to tease out the details from the core; it was that bright there!

Equipment used:
Nikon D750, Rokinon 24mm Cine F/1.5 lens, tripod, Nodal Ninja 4, and remote.

Each panel of the 6-part panoramic image was shot with the following EXIF:
3200 ISO, 20 seconds, 24mm, at f/2.0.

If any of you ever have any questions about photography, feel free to send me a message!

Friday, September 23, 2016

Application review: paintRack!


Well it’s certainly been a few weeks since I had time to update the blog.  I’ve been busy with getting work done in anticipation for my wedding which occurred a mere week ago and tomorrow I leave for my honeymoon.  For a week, I’ll be enjoying the Hawaiian island of Kauai.  (I’m really hoping my Bolt Action V2 rulebook shows up tonight as the flights to and from will be quite long).

In the weeks leading up to my wedding and honeymoon, I haven’t been able to do much painting.  I did have time to completely restructure my workstation.  My new set of Scale Color, by Scale 75, paints came in as well as my organizers.  While I was going through all of my stuff, I utilized a new application on my phone called “paintRack”.  For someone who’s as OCD about keeping their station somewhat organized, this application is a dream to work with as it allows you to not only keep track of which paints you have, but also allows you to view complimentary colors and similar colors across several different ranges.

paintRack is a great application by the company Courageous Octopus.  It’s team of developers consists of gamers and painters alike including a 1994 North American Golden Demon Winner.

As of the most recent update, pR has a library of over 3,500 manufacturers from many of the top manufacturers on the market currently.

The supported manufactures are:

Vallejo, P3 (Privateer Press), Reaper, Citadel, Army Painter (Warpaints),Tamiya, Scale75, Coat d'Arms, Badger Minitaire, Warcolours, Humbrol, Andrea Color, AMMO by MIG Jimenez, Battlefront (Colours of War), AK Interactive, Abteilung 502, and Secret Weapon.

Starting the application up, it allows you to browse across the whole menagerie of manufacturers or to actually begin constructing your own collection of paints.  To create your own, you’re able to launch a search for your color and claim it in your collection or, better yet, utilize the bar scanner function to actually scan the paints in!  There’s even a quick scan mode that allows you to scan one paint after another to quickly rifle through your collection. I ran my entire Vallejo Model Color, Scale 75, Ammo by Mig, and P3 paints through the scanner in a little under 10 minutes (I have way too much paint.).  The scanner was able to keep up and the application never hiccupped through the entire process.


With my collection scanned, I’ve been able to actually use my phone to assist me during “paint runs” to my local hobby store by using the “Wish List” function.  In the past I’ve actually bought duplicates of certain paints because I had actually forgot about different colors that I had in my collection at home but had failed to jot them down.  Having my collection’s contents at hand has been pretty nifty when I’m on the go.

Aside from keeping track of my colors, the application shines with its ability to cross reference different colors across different ranges.  This is a very useful tool as, at times, my local stores may or may not have the colors I’m looking for in a particular range so I substitute to a different manufacturer.  pR also allows me to create triads from across different ranges as well as identify complimentary colors across different ranges.

One final bit that I’ll mention about this application is that it allows you to create sets and subsets. This function is great as it allows you to keep track of the different paints you’ve used to paint models and certain elements of a model.  In the past I’ve used a notebook or a spreadsheet on my computer but having this ability on my phone, while using the scanner, has been quick and painless and very organized.  For the sets function for example, I’ll assign a name/ category for an American USMC figure.  For a subset, I’ll assign one for the boots, the webbing, the skin, the face, and so on.  It’s a great way to keep things organized and it makes it easy to add or change a list if necessary.  I can see this function of pR being great for commission painters or people, like me, who have a horde of figures and armies to eventually paint.


pR is available on your application store for your Android; the version for iPhone hasn't been released yet and I believe it's in the works. The app is free and you can use a majority of the features, but you can unlock the entire version for only a few bucks.  I tried out the free version for a bit and then paid the $2.99 to unlock the entire application’s features.  In my opinion it’s worth it.

For the OCD painter in me, this application is worth its weight in gold.  Feel free to check out paintRack by clicking on the hyperlink.  If you enjoyed the review, feel free to leave a comment below as it really helps the site out.

Very shortly, I’ll be posting my guide to how I painted Rubicon’s Sd.Kfz.250!  Until next time, have a great one.

Monday, September 5, 2016

Busy, busy, busy

With my wedding less than 11 days away, my schedule has been hectic to say the least.  Never the less, I was able to carve some time out this weekend to put my new shelving up for my paints.
Once through wedding and honeymoon are over, I'll be back at it!
Jake

Monday, August 22, 2016

Slow and Steady

Progress has been rather slow as of late due to scheduling conflicts and the works.  With my wedding only a few weeks out, I trust that it will only become a little more hectic!

I managed to get the initial coat of the washable sand applied to the Alte.  I'm in the midst of creating a full-length tutorial that will be published here in the next week or so.


Additionally, I broke out the dremel and decided to refit the 88mm to the PZ IV by lowering the deck down a bit.  I'm still on the fence with adding the shield (even though the rules give it to you) as I've seen the actual vehicle with and without the shield in place.  If did add the shield, it does obstruct the gun's ability to swivel.  I'll make a decision soon enough.


Thanks for looking,

Jake